
Is your old thermostat making your electric bills too high? Do you want a smart thermostat that you can control from your phone? Good news! You can upgrade your thermostat yourself. This guide will show you how to upgrade thermostat safely and easily.
What You Need to Know Before You Start
Before you buy a new thermostat, you need to check a few things. This will save you time and money.
Check What Kind of System You Have
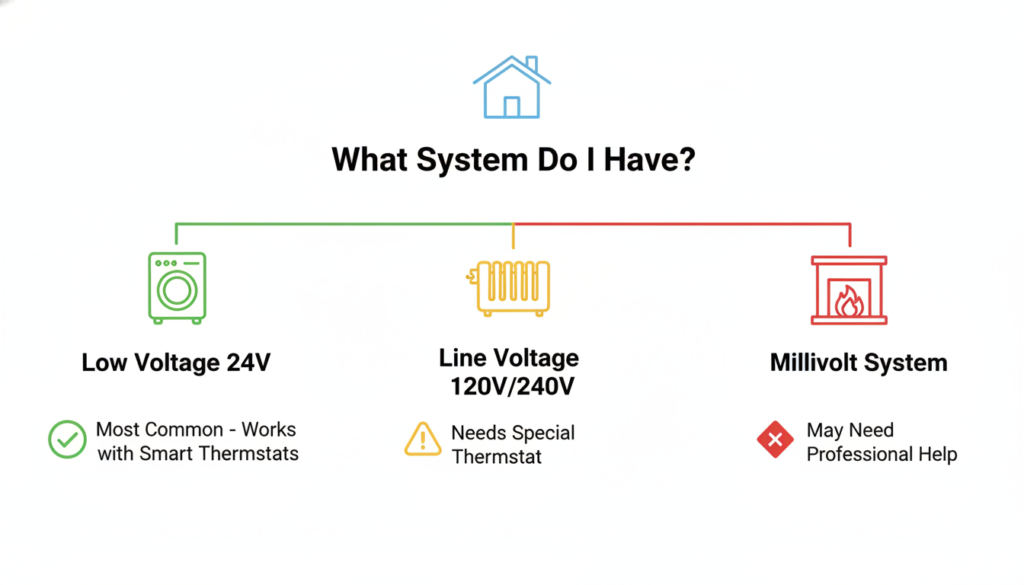
Not all thermostats work with all heating systems. There are three main types:
Low-Voltage Systems (24V) – Most homes have this type. If you have central air or a furnace, you probably have a low-voltage system.
Line-Voltage Systems (120V or 240V) – These are usually in homes with electric baseboard heaters. They use more power.
Millivolt Systems – Some gas fireplaces and wall heaters use this type.
Here is the important part: You cannot put a regular smart thermostat on a high-voltage system. It can start a fire or break your new thermostat. Always check first!
How to Check Your Voltage
This is easy:
- Take off the cover of your old thermostat
- Look for numbers that say “24V” or “120V” or “240V”
- Take a picture with your phone
If you cannot find the voltage, look at your heating system. Central air and furnaces are almost always 24V. Baseboard heaters are almost always 120V or 240V.
Look at Your Wires
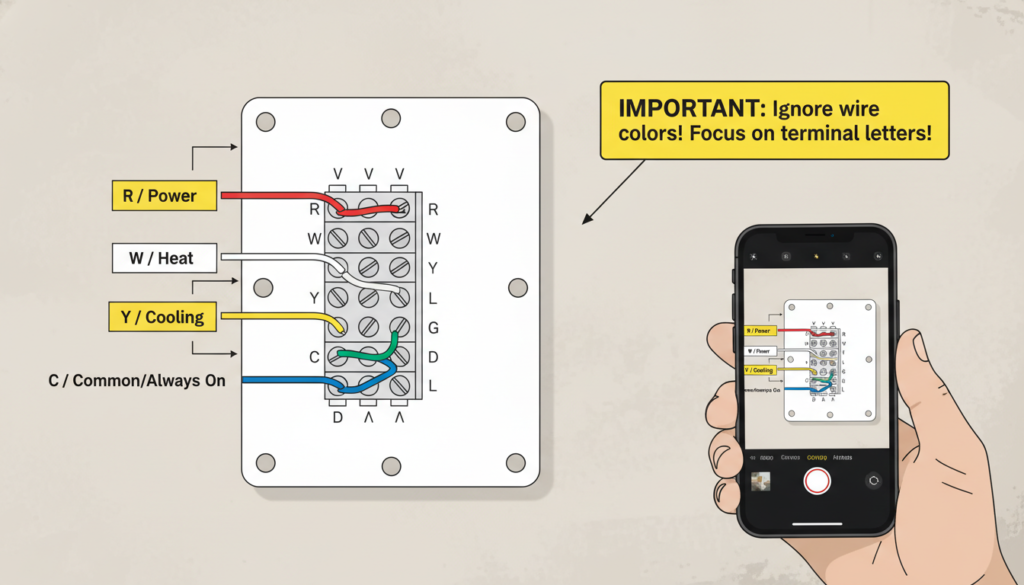
Open your old thermostat and look at the wires. You will see letters next to where each wire connects. These letters are very important. Do not worry about wire colors! Wire colors can be different in different homes.
The common letters are:
- R – This brings power to your thermostat
- W – This controls your heat
- Y – This controls your air conditioning
- G – This controls your fan
- C – This is the common wire (we will talk about this a lot!)
Take a picture of these wires before you do anything else. This picture will help you later.
The C-Wire Problem (And How to Fix It)
Here is something many people do not know: most smart thermostats need a C-wire to work right.
Why Do Smart Thermostats Need a C-Wire?
Old thermostats were simple. They used batteries or just acted like a switch. Smart thermostats are like tiny computers. They have screens, WiFi, and apps. They need constant power to work.
The C-wire gives your thermostat constant power. Without it, your smart thermostat might:
- Die very fast
- Lose WiFi connection all the time
- Not work at all
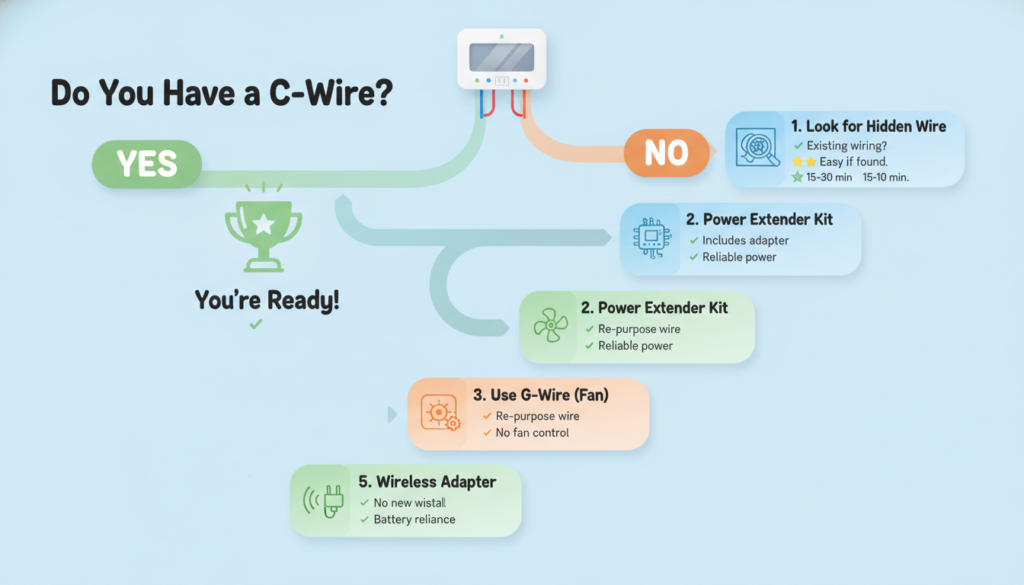
Do You Have a C-Wire?
Look at your old thermostat again. Is there a wire connected to the letter “C”?
If yes – great! You are ready to go.
If no – don’t worry! There are five easy ways to fix this.
Solution 1: Find a Hidden Wire
Many homes already have a C-wire. It is just hiding in the wall!
Most thermostat cables have 5 to 8 wires inside. But old thermostats only used 4 or 5 of them. The extra wires are tucked behind the wall.
Look inside the hole where your thermostat wires come out. Do you see any extra wires? If yes, you can use one of these as your C-wire.
You will need to connect this wire at two places:
- At your thermostat (to the C terminal)
- At your furnace (to the C terminal on the control board)
Solution 2: Use a Power Extender Kit
Many smart thermostats come with something called a Power Extender Kit or PEK. This little device is very smart. It lets you use your old wires in a new way.
The kit goes inside your furnace. It combines some signals so you do not need a separate C-wire. Ecobee thermostats come with these kits.
Solution 3: The Fan Wire Trick
If you never use your fan by itself (only when heating or cooling), you can use the G-wire as a C-wire instead.
This works, but you give up one thing: you cannot run just the fan anymore. For most people, this is okay.
Solution 4: Plug-In Adapter
Some thermostats can use a small power adapter. You plug it into a regular wall outlet near your thermostat. This gives your thermostat the power it needs.
This only works if you have an outlet close to your thermostat.
Solution 5: Wireless Module
For very old systems with only 2 wires, you can buy a wireless interface module. One part goes at your furnace. One part goes at your wall. They talk to each other over your old wires.
This is the most expensive option, but it works when nothing else does.
What Tools Do You Need?
You do not need many tools to upgrade your thermostat. Here is what to get:
Must Have:
- A screwdriver (the kind with a plus sign, called Phillips)
- Your phone camera
- A small level (to make sure your thermostat is straight)
- A voltage tester (this keeps you safe)
Nice to Have:
- Labels for your wires (your new thermostat probably comes with these)
- Tape to hold wires so they do not fall in the wall
- A trim plate (if your new thermostat is smaller than your old one)
How to Upgrade Thermostat: Step by Step
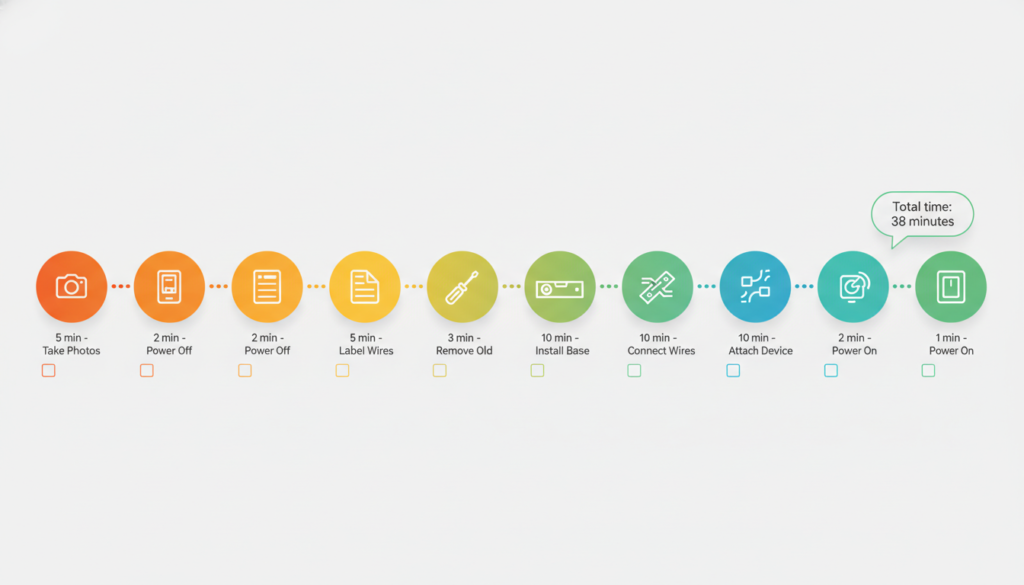
Now we get to the fun part! Follow these steps and you will have your new thermostat working in less than an hour.
Step 1: Take Pictures (5 minutes)
This is the most important step. Take clear pictures of your old thermostat wiring. Take pictures from different angles. Make sure you can see which wire goes to which letter.
Save these pictures. Text them to yourself. You will thank yourself later if something goes wrong.
Step 2: Turn Off the Power (2 minutes)
Safety first! Go to your circuit breaker box. Find the switch that says “Furnace” or “HVAC” or “Air Conditioning.” Flip it to OFF.
Go back to your thermostat. If it still has power, you turned off the wrong breaker. Try again.
After you turn off the right breaker, put a piece of tape on it. Write “DO NOT TURN ON” on the tape. You do not want someone turning it back on while you work.
Step 3: Label Your Wires (5 minutes)
Your new thermostat should come with small stickers. Each sticker has a letter on it.
Take off your old thermostat cover. Look at each wire. Put the matching sticker on each wire. If a wire is connected to “R”, put the “R” sticker on that wire.
This step is super important. Do not skip it!
Step 4: Remove Your Old Thermostat (3 minutes)
Unscrew your old thermostat from the wall. Gently pull it away. You will see your wires.
Here is a trick: Before you disconnect the wires, wrap them around a pencil or stick something through them. This keeps them from falling back into the wall. You can also use painter’s tape to tape them to the wall.
Now disconnect each wire. Remember, you already labeled them, so you know where they go!
Step 5: Install the New Base Plate (10 minutes)
Your new thermostat comes in two parts. The base plate goes on the wall first.
Put the base plate on the wall. Use your level to make sure it is straight. A crooked thermostat looks bad!
Mark where the screws will go with a pencil. If your new thermostat goes in the same spot as your old one, you can use the old screw holes.
Drill small holes if you need to. Then feed your wires through the hole in the base plate. Screw the plate to the wall.
Step 6: Connect Your Wires (10 minutes)
This is where your labels help a lot!
Look at the back of your base plate. You will see the same letters: R, W, Y, G, C.
Connect each wire to the matching letter. Most thermostats have little buttons you push down to open the terminal. Put the wire in and let the button go. The wire should be held tight.
Make sure each wire is pushed in all the way. Pull on each wire gently. It should not come out.
Special note: If you have a heat pump, you might have an O-wire or B-wire too. Connect it to the O/B terminal.
If you used one of the C-wire solutions from earlier, connect your C-wire now.
Step 7: Attach the Thermostat (2 minutes)
Tuck any extra wire back into the wall. You do not want wires sticking out.
Take the front part of your thermostat. Line it up with the base plate. Push it on or screw it in place (depends on your model).
Step 8: Turn the Power Back On (1 minute)
Go back to your breaker box. Flip the switch back to ON.
Go back to your thermostat. It should light up! If it does not, check your wire connections again.
Set Up Your New Thermostat
When your thermostat turns on for the first time, it will ask you some questions.
Basic Setup
First, it will ask simple things:
- What language do you speak?
- What time is it?
- What is your zip code?
Answer these questions. They help your thermostat work better.
Tell It About Your System
Now comes an important part. Your thermostat needs to know what kind of heating and cooling system you have.
It will ask:
- Do you have a furnace or a heat pump?
- How many stages of heating do you have? (Most people have 1)
- How many stages of cooling do you have? (Most people have 1)
If you are not sure, choose the simple options. You can always change this later.
Connect to WiFi
If you have a smart thermostat, it will ask for your WiFi password. Type it in carefully.
Once connected, you can download the app on your phone. The thermostat will show you a code. Put this code in the app. Now you can control your thermostat from anywhere!
Test Everything
Time to make sure everything works!
Test the Heat: Set your thermostat 5 degrees higher than the current temperature. Wait a few minutes. You should hear your furnace turn on.
Test the Cooling: Set your thermostat 5 degrees lower than the current temperature. Wait a few minutes. You should hear your air conditioner turn on.
Test the Fan: Switch to fan mode. Your fan should turn on by itself.
If all three work, you did it! You successfully upgraded your thermostat!
What If Something Goes Wrong?
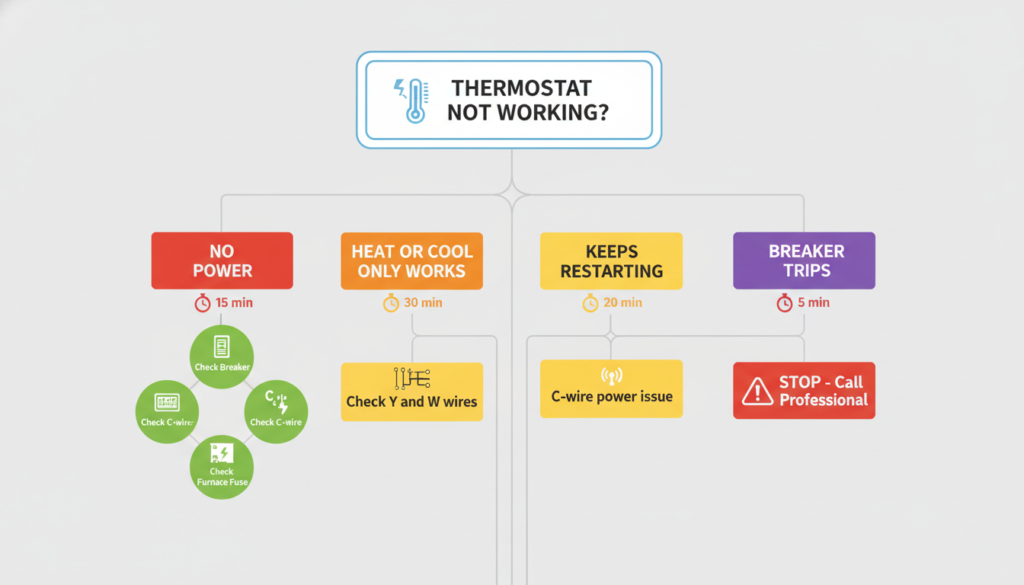
Sometimes things do not work perfectly. Here are common problems and fixes.
The Thermostat Has No Power
Check these things:
- Is the breaker turned on?
- Is the C-wire connected at both ends?
- Is there a fuse in your furnace? (Check the furnace manual)
Heat Works But AC Does Not (or the other way around)
This usually means one wire is wrong. Look at your picture again. Make sure the Y-wire is really connected to Y and the W-wire is connected to W.
The Thermostat Keeps Restarting
This means it is not getting enough power. Check your C-wire connection. You might need to use one of the C-wire solutions we talked about earlier.
When to Call a Professional
Sometimes you need help. Call a professional if:
- Your breaker trips when the system turns on
- You smell burning
- Your system is very old or unusual
- You have more than one furnace or AC unit
- You are not comfortable working with electricity
There is no shame in calling for help! Safety is most important.
Make Your Smart Thermostat Work Better
Now that your new thermostat is working, here are ways to save even more money:
Set a Schedule
Smart thermostats work best with a schedule. Tell it:
- What temperature you want when you are home
- What temperature you want when you are sleeping
- What temperature you want when you are away
Most people like it warmer when awake and cooler when sleeping or away. This saves a lot of money!
Use Geofencing
Many smart thermostats can tell when you leave home (using your phone location). They can automatically change the temperature when you leave and change it back before you get home.
This is great if your schedule changes a lot.
Check Your Energy Reports
Most smart thermostats show you how much energy you use. Look at these reports every month. They will show you when you use the most energy. Then you can make changes to save more money.
Change Your Filters
Your new thermostat can remind you to change your air filter. Set this reminder! Dirty filters make your system work harder and use more electricity.
Final Thoughts
Learning how to upgrade thermostat is easier than most people think. If you take your time and follow the steps, you can do it yourself in about an hour.
The hardest part is usually the C-wire. But now you know five different ways to solve that problem!
Your new smart thermostat will save you money every month. Most people save $100 to $200 per year on their electric bills. That means your thermostat pays for itself in just 1 or 2 years.
Plus, you get to control your temperature from your phone. You can turn on the heat before you get home on cold days. You can turn off the AC if you forgot when you left. That is pretty cool!
Remember: Always turn off the power before you work. Take pictures of your wiring. Label everything. If something feels wrong or unsafe, stop and call a professional.
You can do this! Thousands of people upgrade their thermostats every day. Now you know how to upgrade thermostat too.
Good luck with your project!