When the summer heat rolls in, your air conditioning unit becomes the most crucial piece of equipment in your home. It works tirelessly, often running for hours on end to keep your living space cool and comfortable. Yet, many homeowners neglect this vital system until it fails. Regular AC maintenance is not just about fixing problems; it’s a proactive strategy that ensures peak performance, saves you significant money, and dramatically extends the life of your unit.
This comprehensive guide breaks down How to Maintain AC System and the essential maintenance tasks into easy-to-follow DIY steps and clearly defines when professional service is absolutely necessary. Following this checklist guarantees that your air conditioner operates efficiently all season long.
Why AC Maintenance is Your Home’s Best Investment
The secret to a long-lasting, reliable cooling system lies in consistent upkeep. Neglecting maintenance inevitably leads to unnecessary strain on components, which can accelerate wear and tear and drive up your utility costs.
The Critical Role of Regular Upkeep
AC maintenance is fundamentally key to keeping your home cool, comfortable, and energy-efficient, particularly during high-use cooling seasons. By adhering to a scheduled maintenance regimen, you are protecting a major home investment and ensuring a reliable environment inside, regardless of the temperature outdoors.
Core Benefits of Routine Maintenance
The advantages of performing routine AC maintenance are clear, tangible, and financially sound:
- Saves Money: Proper maintenance ensures the system runs at its maximum efficiency, leading to a significant reduction in your energy bills. For instance, a dirty filter alone can increase your system’s energy consumption by a staggering 5% to 15%.
- Extends Lifespan: A central AC unit that receives proper upkeep can realistically last 15 to 20 years. Conversely, neglecting this critical maintenance can cut the system’s lifespan in half, forcing an early and expensive replacement.
- Prevents Breakdowns: Routine checks are designed to catch small, developing issues,such as minor refrigerant leaks or loose connections,before they escalate into major, costly system failures that require emergency service during peak heat.
- Improves Indoor Air Quality: When coils and filters are consistently clean, they function optimally, leading to healthier air circulation within your home by effectively removing pollen, dust, and other common allergens.
- Maintains Warranty: It is critical to note that many manufacturers require annual maintenance performed by a licensed professional to keep your product warranty valid.
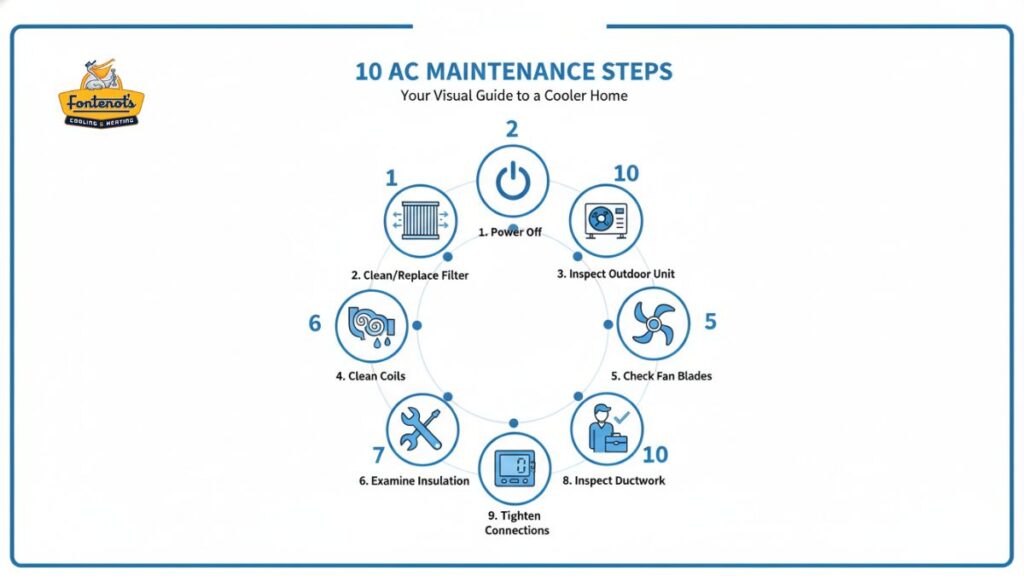
How to Maintain AC System: Essential DIY AC Maintenance Checklist
You don’t need to be a certified technician to handle many crucial maintenance tasks. These steps are safe, require minimal tools, and can be easily integrated into your seasonal home care routine.
A. Powering Down Safely: The First Step
Before you touch any part of the outdoor or internal unit, you must prioritize safety. This crucial safety step involves turning off the power to the AC unit at the service disconnect box, which is usually located near the outdoor condenser, or at the main electrical breaker panel. Confirm that the power is completely off before proceeding with any inspection or cleaning of the internal or outdoor components.
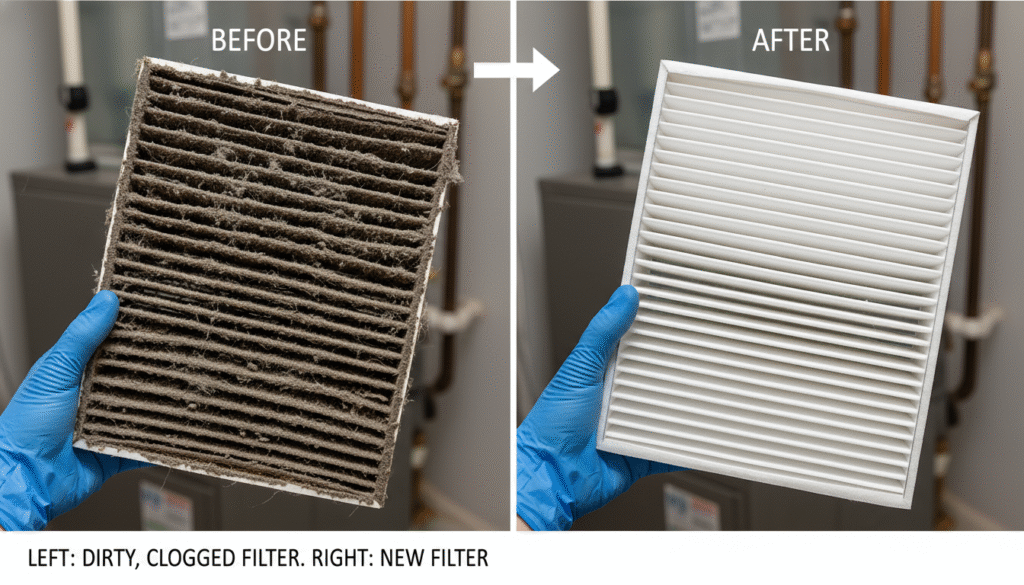
B. Maintain Your Air Filters (The High-Frequency Task)
The air filter is arguably the easiest component to maintain and the one that has the most immediate impact on energy efficiency and air quality.
- Check Frequency: You should make it a habit to check your filter monthly, especially during high-use seasons when the AC is running constantly (e.g., cooling in summer or heating in winter).
- Replacement Schedule: Filters should typically be replaced or cleaned every one to three months. This frequency must be increased if you have specific conditions in your home, such as chronic allergy sufferers, furry pets, or if the unit is in constant use.
- Filter Quality: Opting for the right filter makes a difference. Use high-quality pleated filters, such as those rated 12 MERV, which are superior for residential use. You should avoid using inexpensive fiberglass filters, as these capture less debris and must be changed every 30 days.
- Cleaning Process: It is important to distinguish between filter types. Disposable filters must be replaced entirely. Reusable filters, on the other hand, should be washed thoroughly with warm, soapy water and then dried completely before they are reinstalled into the system.
C. Care for the Outdoor Condenser Unit
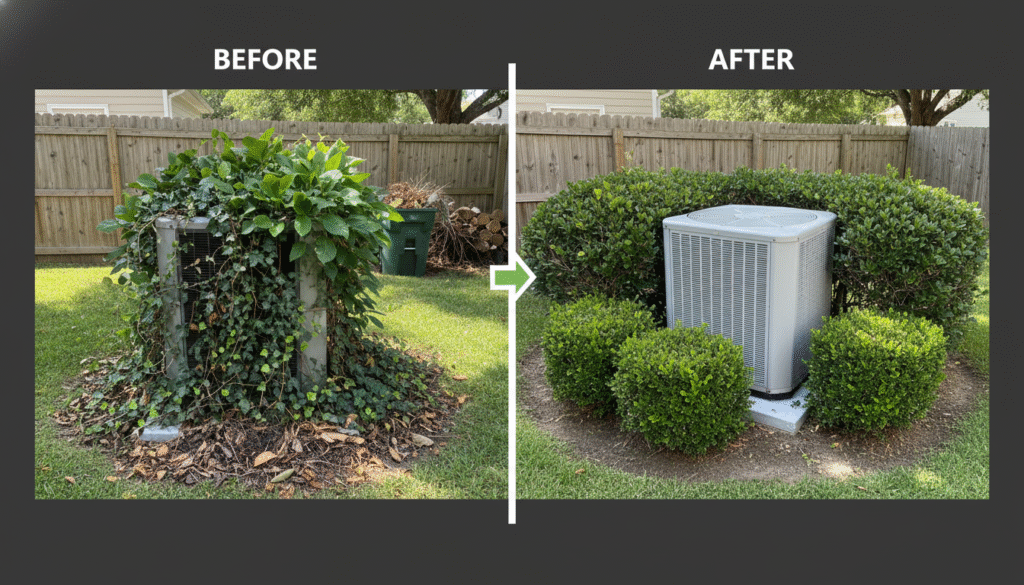
The outdoor unit (compressor/condenser) is exposed to the elements, making it highly susceptible to debris buildup, which hinders its ability to dissipate heat.
- Clear Debris and Maintain Clearance: Start by removing leaves, dirt, grass clippings, and any other accumulated debris from around the base and sides of the unit.
- Trim Foliage: Proper airflow is essential for the condenser’s efficiency. Ensure there is at least 18 inches to 3 feet of clear space surrounding the unit. Trim back bushes, hedges, or trees that may be growing too close.
- Cleaning the Fins/Coil: The delicate coil fins should be gently washed. Use a standard garden hose with a mild spray setting, directing the spray from the top down and working at a 45-degree angle. This angle helps wash debris outward without jamming it deeper into the fins. Warning: Under no circumstances should you use a power washer, as the high pressure can easily bend and damage the delicate aluminum fins.
- Straightening Fins: Inspect the thin aluminum fins for bends or warping, as these restrict necessary airflow. If you find bent sections, you can carefully straighten them using a specialized air conditioner fin comb. Alternatively, a thin, dull metal object can be used with care.
- Level Check: Verify that the outdoor unit is sitting level and flat on the ground. If the unit is noticeably tilting, this can cause operational damage or result in improper lubricant pooling inside the compressor.
D. Inspecting and Cleaning Coils and Drains
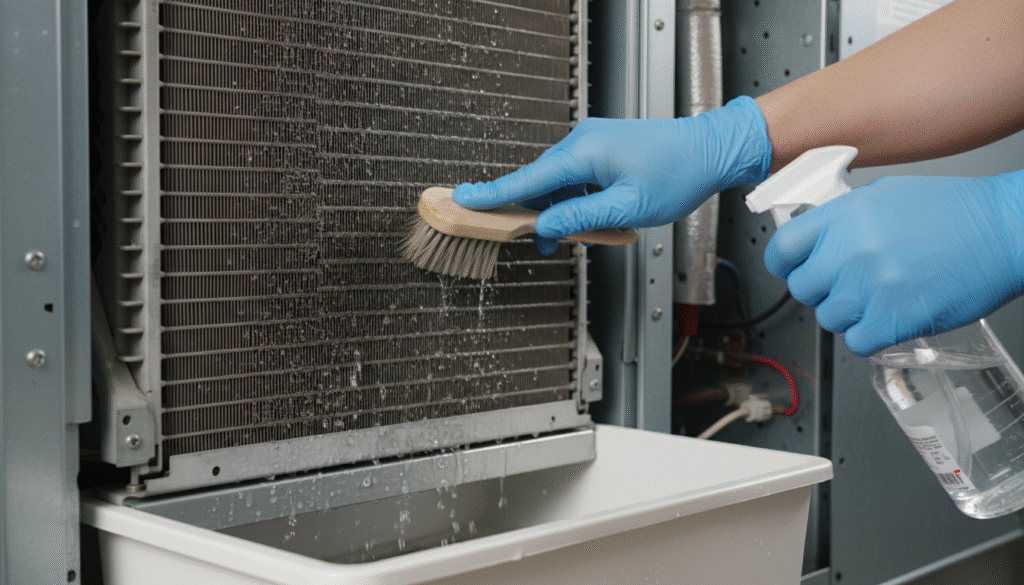
While cleaning the outdoor unit is vital, the indoor components,specifically the evaporator coils and the drain line,also require regular attention to maintain cooling capacity and prevent water damage.
- Evaporator Coils (Indoor Unit): The dust and grime that accumulate on the evaporator coil directly reduce the unit’s cooling capacity. After accessing the indoor unit, gently remove surface dust using a soft brush vacuum attachment. You can then apply a specific no-rinse coil cleaner, allowing the residue to drain away debris through the condensate pan. It is important to note that due to accessibility constraints and system complexity, extensive cleaning of internal coils is often best delegated to a professional technician.
- Condensate Drain Line: Check the condensate drain pan for pooling water or the drain line for clogs. Pooling water around the base of the indoor unit is a primary indication of an obstruction. To resolve a minor clog, flush the drain line with a mixture of water and white vinegar or a mild bleach solution. This process helps prevent the buildup of mold, mildew, and algae. For stubborn blockages, you may use a wet/dry vacuum to suck out obstructions from the drain line exit point outside the home.
E. Checking Internal Components (DIY & Professional Scope)
A visual inspection of key internal components can provide early warnings about potential malfunctions.
- Condenser Fan Blades: Inspect the fan blades mounted within the outdoor unit. Check them closely for any chips, cracks, or excessive wear. Damaged blades should be replaced promptly, as they can cause vibration and prevent the optimal cooling performance of the unit.
- Insulation: Examine the insulation material covering the copper refrigerant piping and the visible sections of ductwork. Any exposed sections or damaged insulation will drastically reduce thermal efficiency and must be replaced to prevent energy loss.
- Wiring and Connections: With the power firmly off, visually inspect the electrical connections and wiring. Look for obvious signs of overheating, such as blackened or melted insulation. If connections appear loose, carefully tighten them. Due to the risk of high voltage, comprehensive electrical troubleshooting or complex wiring checks should be left entirely to a licensed professional.
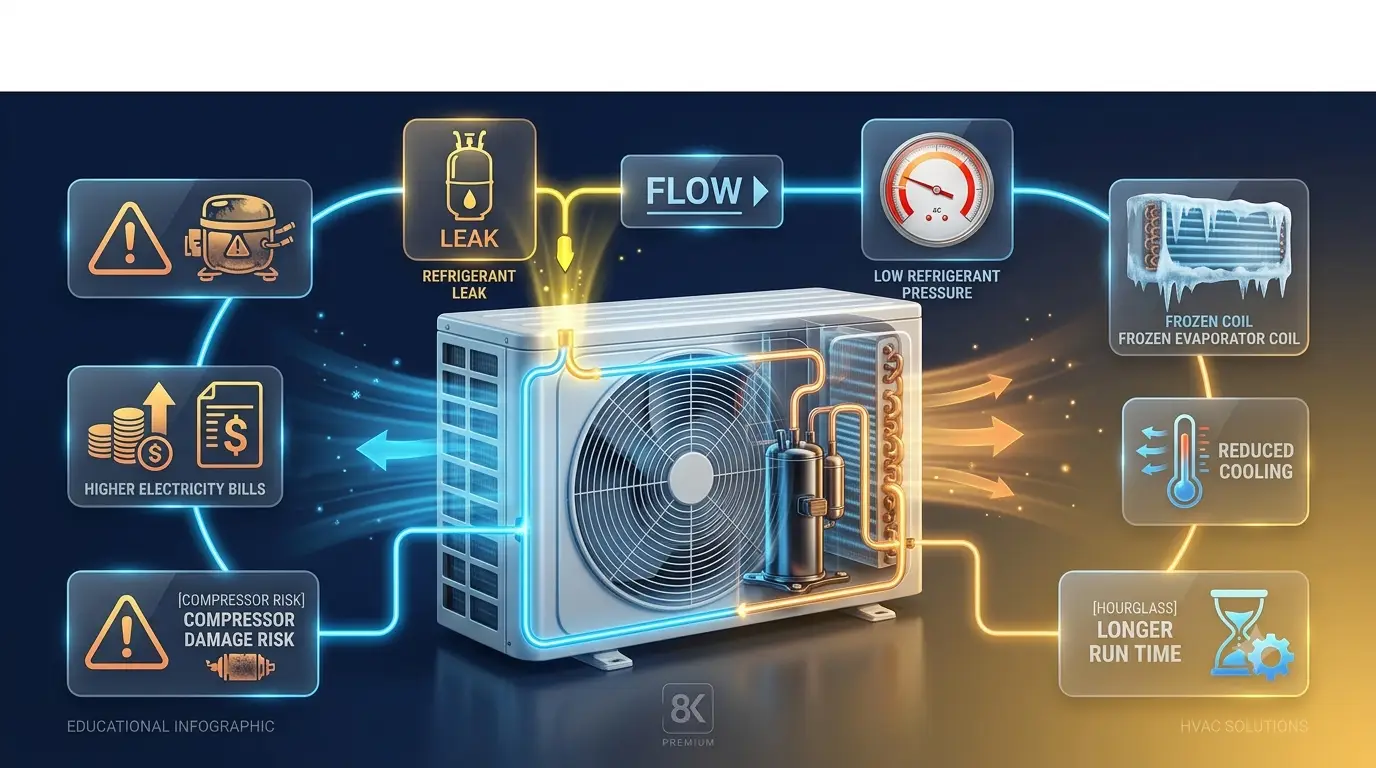
- Refrigerant Lines: Visually inspect the copper refrigerant lines. The most serious warning sign is the presence of visible ice or frost buildup on the tubing or the outdoor coil. Icing typically indicates a significant problem, often a refrigerant leak or serious airflow issue. If you observe ice, immediately turn off the AC function and run the fan only to thaw the system, then call a professional technician.
F. Optimizing Airflow and Efficiency Indoors
Your unit’s efficiency relies heavily on clear, unobstructed airflow throughout your home’s distribution system.
- Vents and Registers: Regularly dust and vacuum the supply and return air vents throughout your house. Crucially, make sure that no furniture, curtains, or large rugs are blocking the vents, as these obstructions severely hinder proper airflow and cooling delivery.
- Ductwork Integrity: Inspect any visible sections of your ductwork system, paying attention to gaps or separations. Air leaks in ductwork can reduce energy efficiency by up to 30%, leading to substantial wasted cooling power. Seal small gaps and holes using specialized foil tape or high-quality duct mastic. Furthermore, a common mistake is closing unused air vents; keep all air vents open, as closing them increases system pressure and can potentially damage the ductwork.
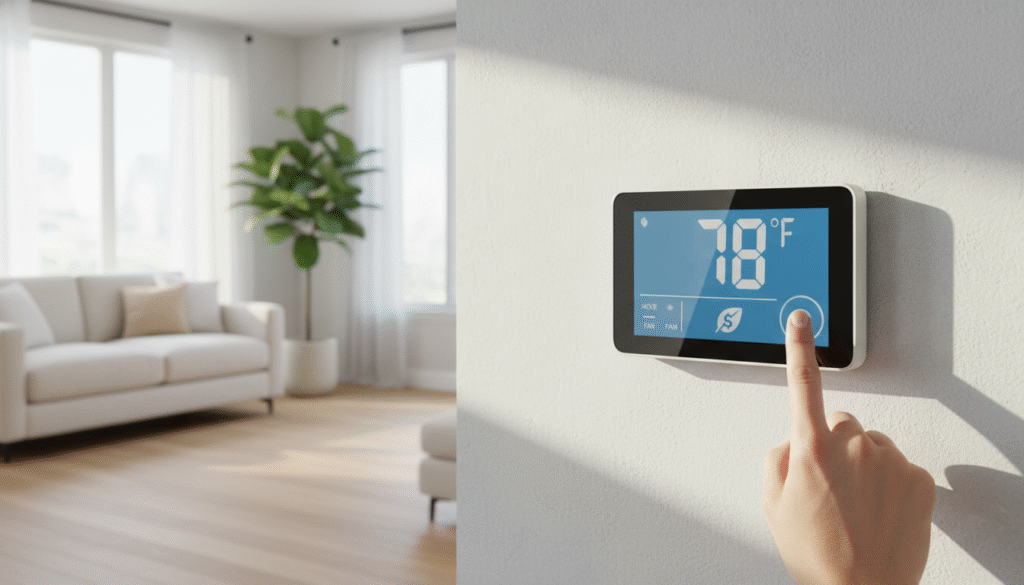
- Thermostat Settings: Ensure your thermostat is functioning accurately. Using a smart or programmable thermostat is highly recommended, as it allows you to set higher temperatures when the house is empty and automatically cool it down just before you return, which optimizes overall energy consumption. For peak efficiency and comfort, ENERGY STAR recommends setting the thermostat to 78°F when you are home and awake.
When to Call for Professional AC Maintenance
While DIY maintenance keeps the system clean, specialized checks and adjustments involving refrigerants, electrical components, and complex internal mechanisms require the training and specialized tools of an HVAC professional.
A. Timing for Professional Service
Scheduling timely professional maintenance is crucial for maximizing system lifespan and satisfying warranty requirements.
- Annual Tune-ups: You should schedule a comprehensive professional maintenance session once a year for your AC unit. The ideal timing for this tune-up is in the late winter or early spring, before the cooling season officially begins.
- Bi-annual Checkups: Many industry experts actually recommend scheduling professional maintenance twice a year,once specifically for the heating portion of the system (if applicable) and once for the cooling function.
Schedule your Annual AC Tune-up with Fontenot’s
B. What a Professional Technician Will Do
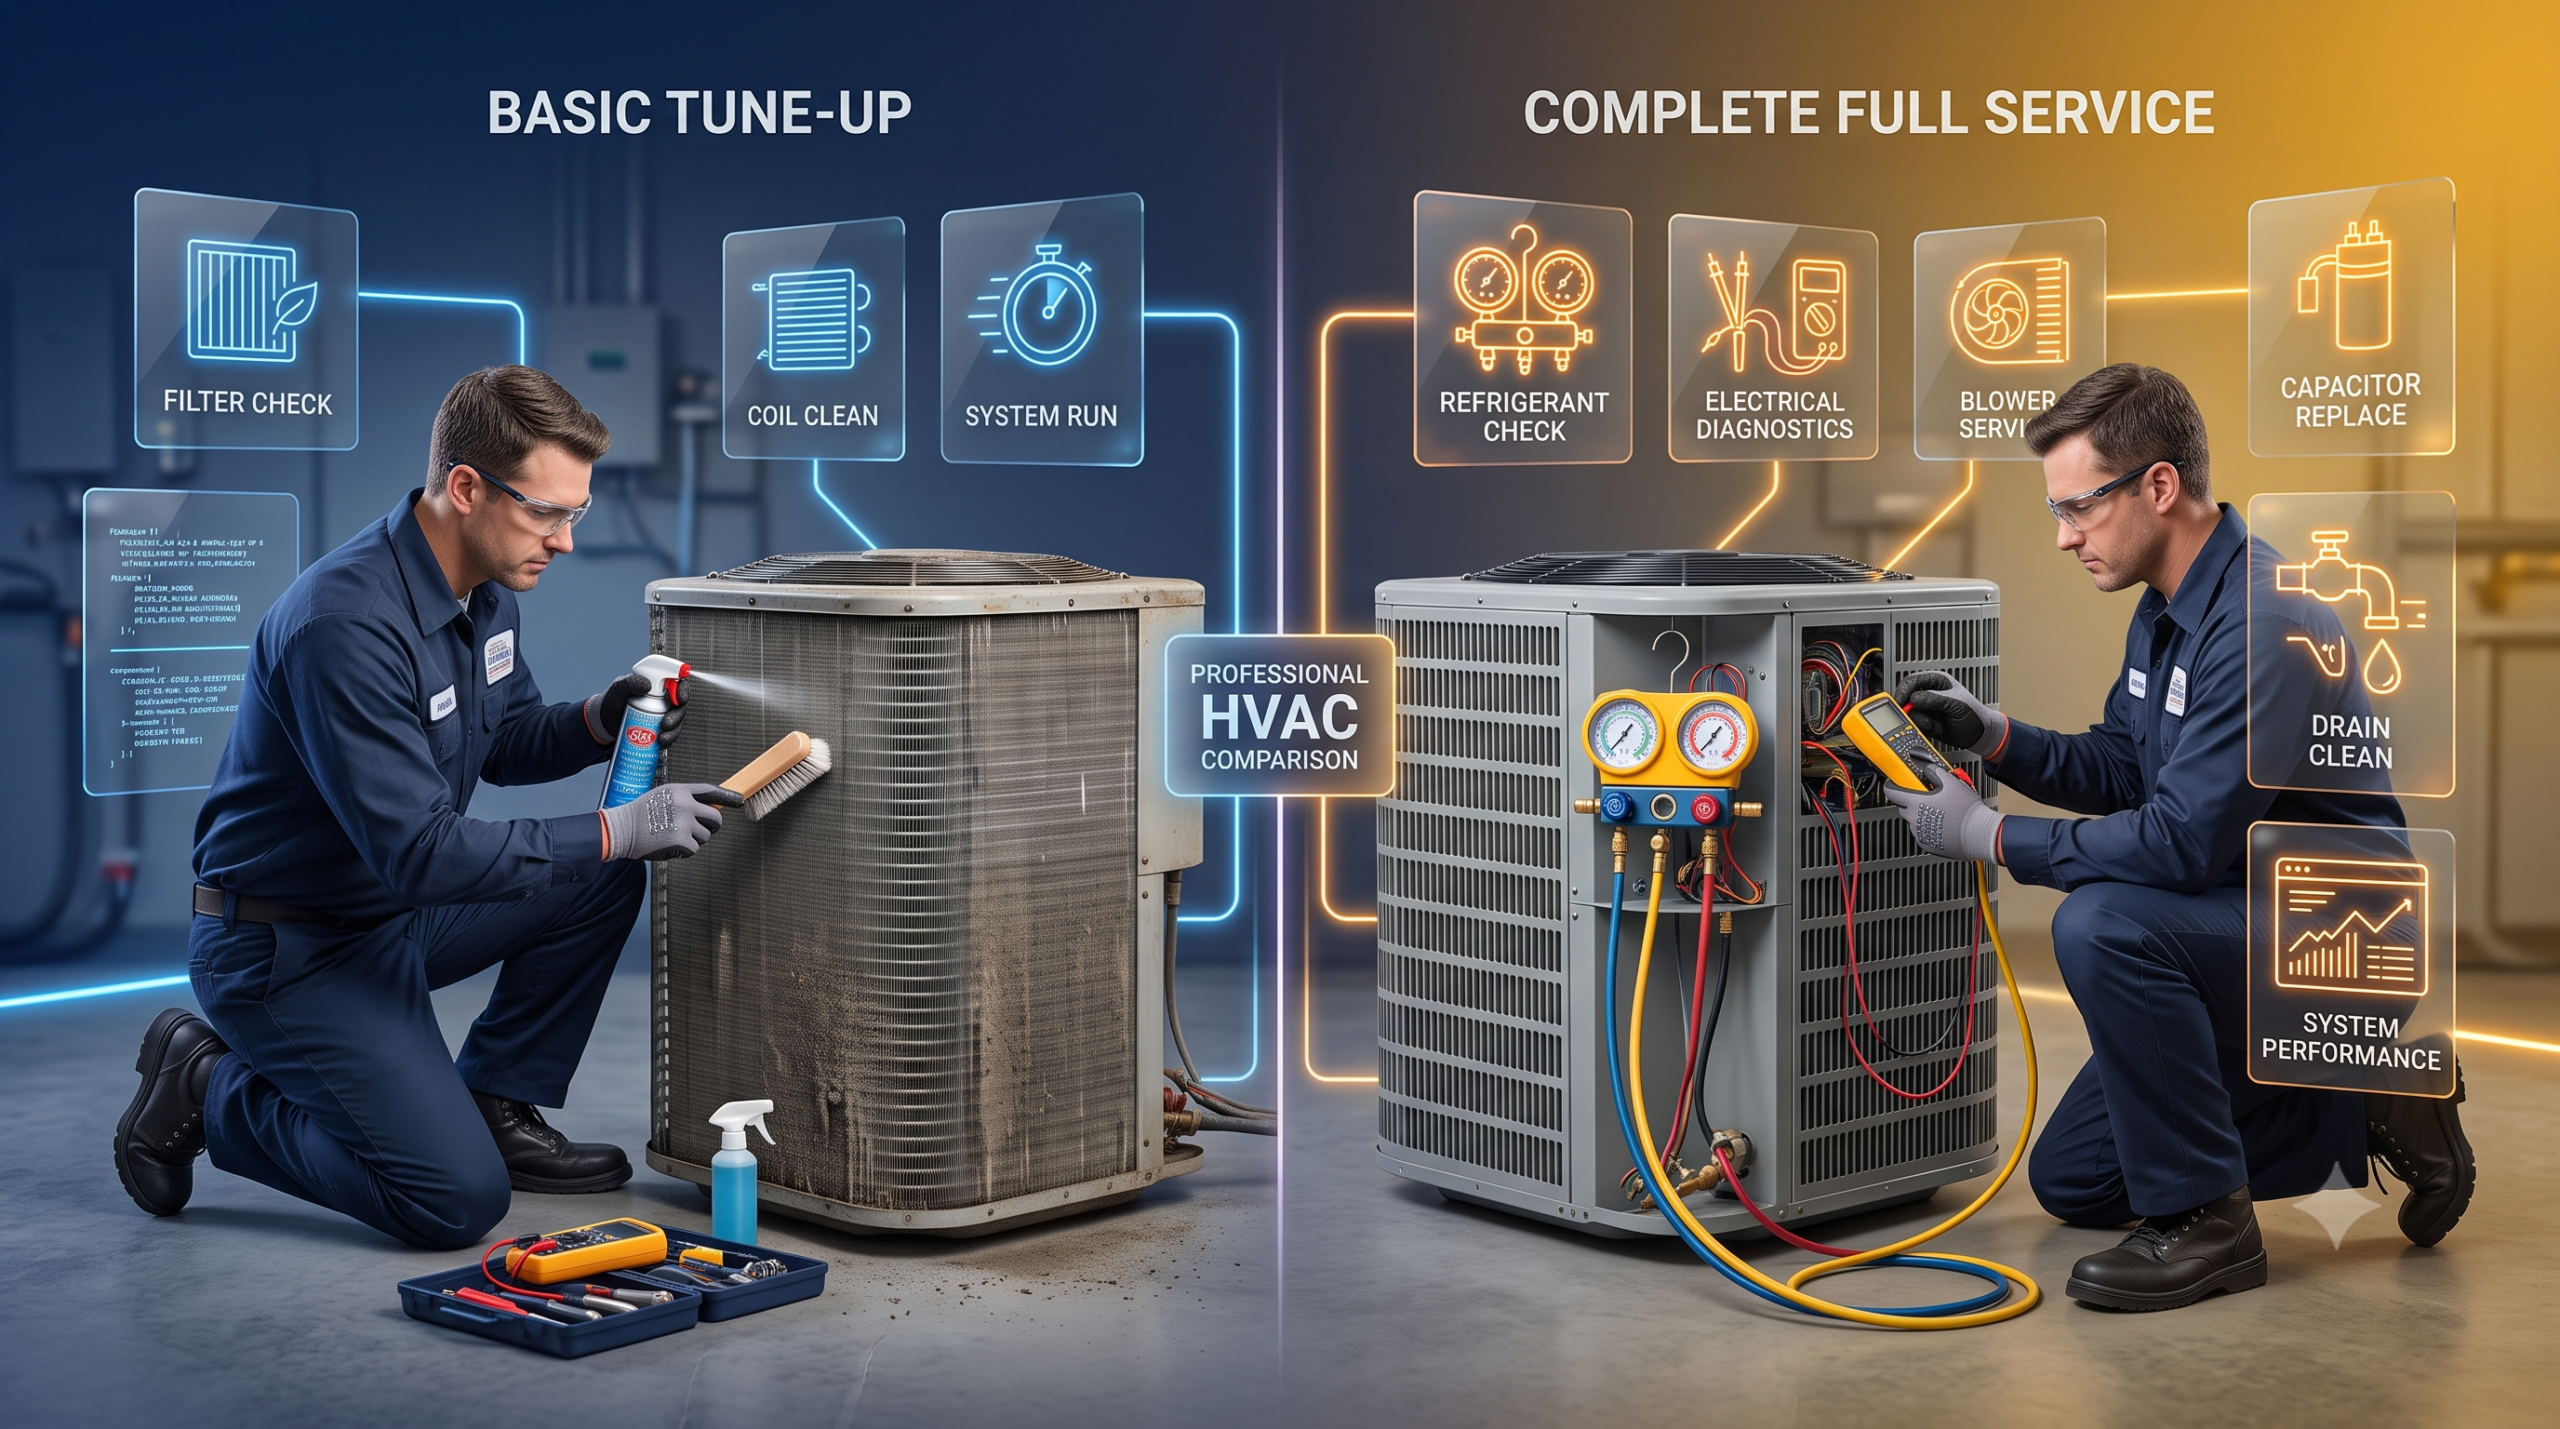
A professional HVAC technician performs deep system checks and preventative measures that extend far beyond the scope of basic DIY cleaning:
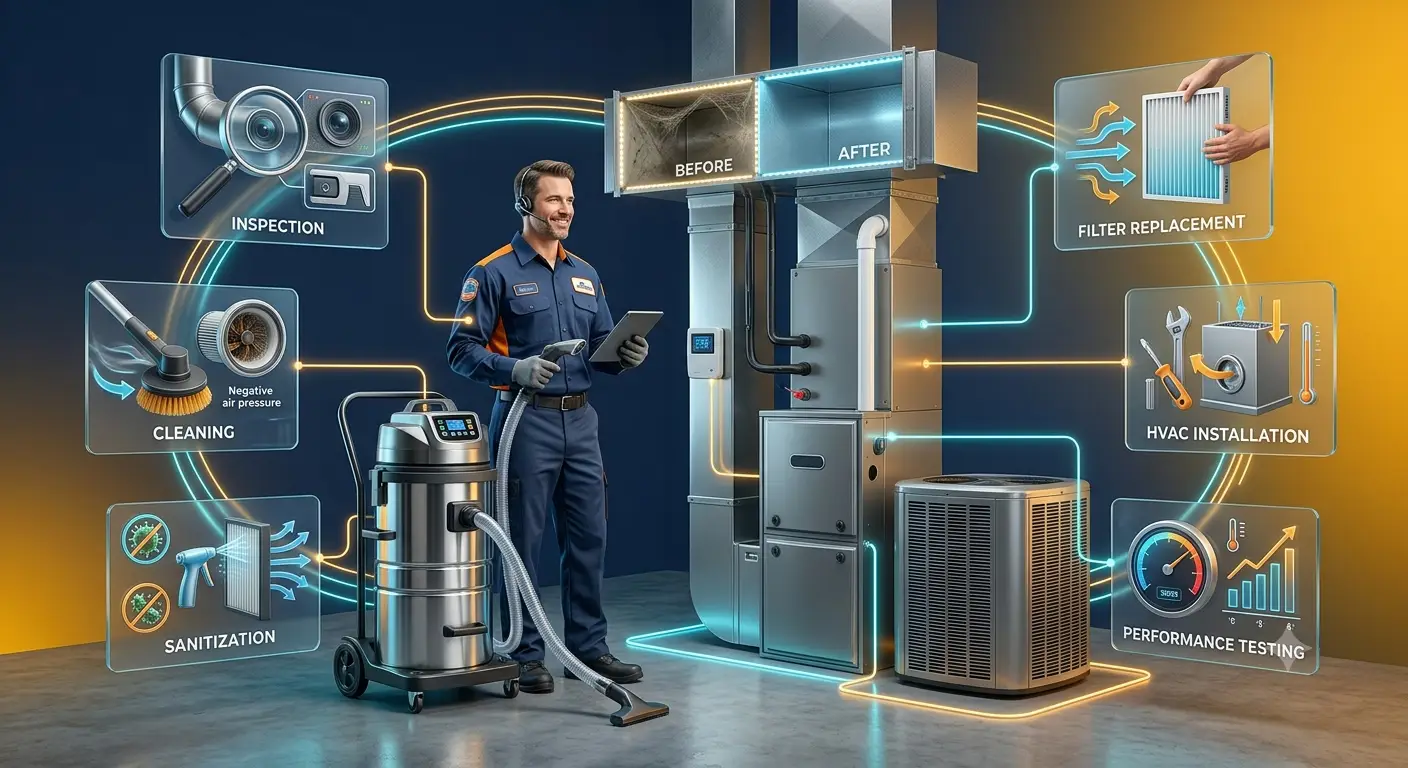
- Comprehensive System Assessment: The technician will clean and thoroughly inspect all system components, test all safety mechanisms, and evaluate the full starting and operating cycle of the unit.
- Electrical Check: This vital step involves measuring the voltage and current running to the motors and tightening all critical electrical connections to ensure safe and efficient operation.
- Refrigerant Management: Professionals are equipped to accurately check and adjust refrigerant levels and pressure. They will also conduct necessary tests to detect any leaks within the closed system.
- Lubrication: Moving parts and motor bearings, especially those found in older AC units, require specific lubrication to operate smoothly and prevent premature wear.
- Coil and Blower Cleaning: The professional will access and clean the evaporator and condenser coils using industrial-grade chemicals and adjust blower components to guarantee proper, optimal airflow.
C. Signs That Warrant a Professional Visit
While minor issues can often be solved with DIY cleaning, certain signs indicate serious, underlying problems that require immediate attention from a certified technician. If you notice any of the following, call for service promptly:
- The AC system fails to run entirely or is simply not cooling adequately.
- The unit is running constantly for extended periods or is short cycling (turning on and off frequently).
- You hear strange or unusual, concerning noises, such as a rattling, buzzing, or banging sound emanating from the unit.
- You detect a suspicious or burning odor, particularly one that smells electrical.
- Visible icing or freezing is present on the outdoor coil or the copper refrigerant tubing.
- Your monthly energy bills have spiked unexplainedly, even though your usage patterns have remained consistent.
- Water leaks or pooling persist around the indoor unit, despite your best attempts to clear the condensate drain line.
Call for Professional AC Repair Service
Specialized Maintenance Tips (Window Units and Efficiency Hacks)
Maintenance principles apply universally, whether you have a large central air system or a standalone window unit. Additionally, simple home improvements can boost the efficiency of any cooling system.
A. Window Unit Maintenance
Window AC units, due to their exposure and compact design, require specific, focused care:
- Window units require similar care to central units, focusing primarily on filters, coils, and drainage.
- The air filters, usually located behind the front grille, should be cleaned or replaced every three months, or more frequently if you observe them becoming dirty.
- Clean both the indoor evaporator coil and the outdoor condenser coil gently using a soft brush.
- Always inspect and clean the condenser fins and the fan blades to reduce mechanical strain on the unit.
- Crucially, check the window seal where the unit meets the window frame. Seal any gaps or cracks using high-quality caulk or weatherstripping to prevent the costly escape of cooled air.
- Be sure to regularly empty and thoroughly clean the residual condensate water pan.
B. Enhancing Home Efficiency
Maximize the effects of your maintained AC unit by minimizing heat gain and air loss throughout your home:
- Home Sealing: Apply new insulation and weather stripping to door and window frames to significantly prevent air infiltration and reduce cooling loss.
- Shading: During the hottest parts of the day, keep blinds or shades drawn to effectively prevent solar heat gain from intense sun exposure.
- Auxiliary Fans: Utilize ceiling or floor fans in conjunction with the air conditioning system. Fans circulate cooled air more efficiently, allowing you to set the thermostat slightly higher without sacrificing comfort.
- HVAC Accessories: Don’t forget the accessories attached to your HVAC system. For humidifiers, swap the pad every season. For air exchangers, clean the filters every four months and clean the inner core twice per year.
Conclusion: Long-Term System Health
Maintaining your AC system is not a tedious chore; it is an intelligent and necessary act of preventative care. By consistently following the straightforward DIY cleaning tips outlined here and committing to professional, annual tune-ups, you are taking proactive, essential steps to maintain peak performance, maximize energy savings, and prevent highly inconvenient breakdowns.
While vigilant maintenance significantly extends system life,typically reaching the 15 to 20 year range,eventually, all units must be replaced. Consider replacing your AC unit if it is significantly aging, requires frequent and expensive repairs, or if it is highly inefficient compared to modern cooling systems, such as the new, highly efficient variable speed models available today. A well-maintained system will serve you faithfully until that time comes, delivering reliable, cool air when you need it most.