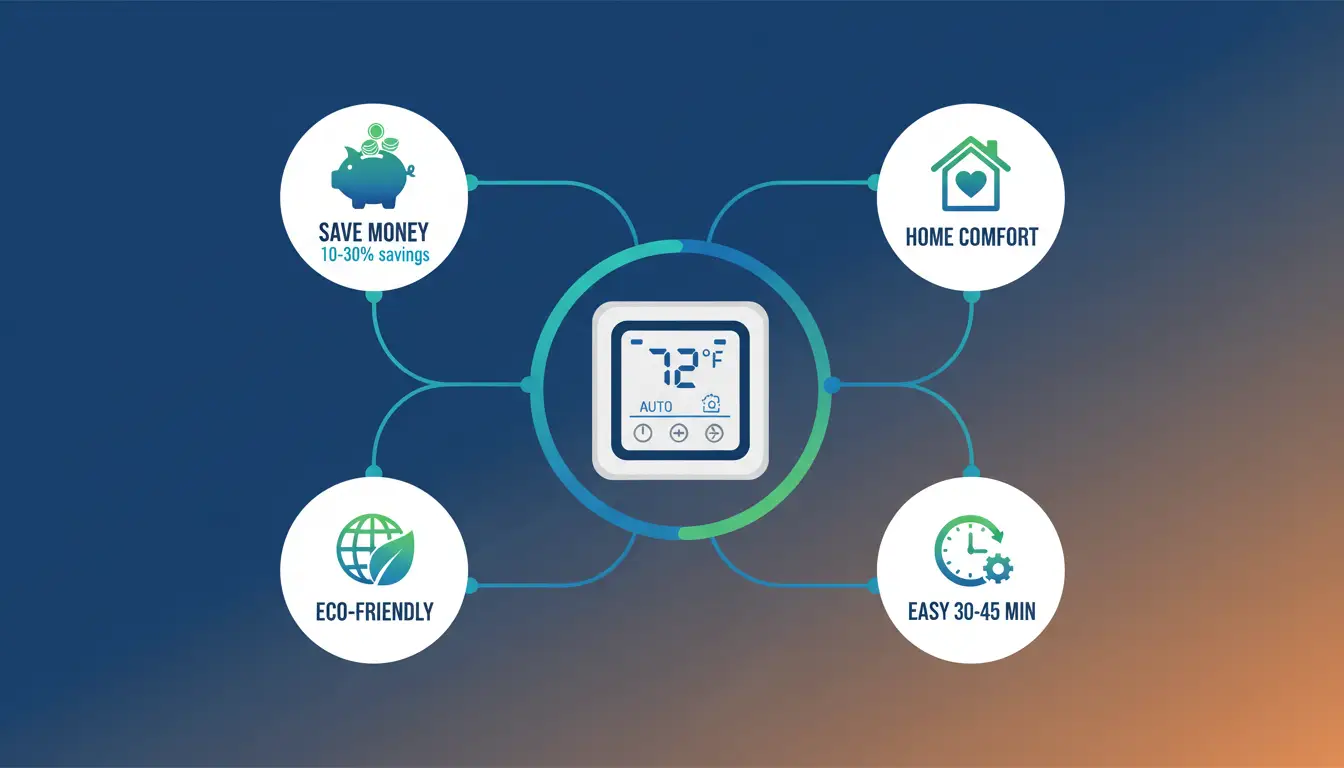
Do you want to save money on your electric bill? A programmable thermostat can help you do that. It lets you control when your heating and cooling turn on and off. This means you don’t waste energy when you’re not home.
Many people think wiring a thermostat is hard. But it’s not! You can do it yourself in about 30 to 45 minutes. This guide will show you how to wire programmable thermostat in easy steps. We will use simple words so anyone can understand.
Why Use a Programmable Thermostat?
Before we talk about wiring, let’s see why you should use one. A programmable thermostat helps you in many ways. First, it saves you money. You can set it to use less energy when you sleep or when you’re at work. This means lower bills every month.
Second, it makes your home more comfortable. You can program it to warm up your house before you wake up. Or cool it down before you come home from school or work.
Third, it’s good for our planet. When you use less energy, you help reduce pollution. This is good for the Earth.
Safety First: Things You Must Do Before Starting
Safety is very important when you work with electricity. You must follow these steps before you start.
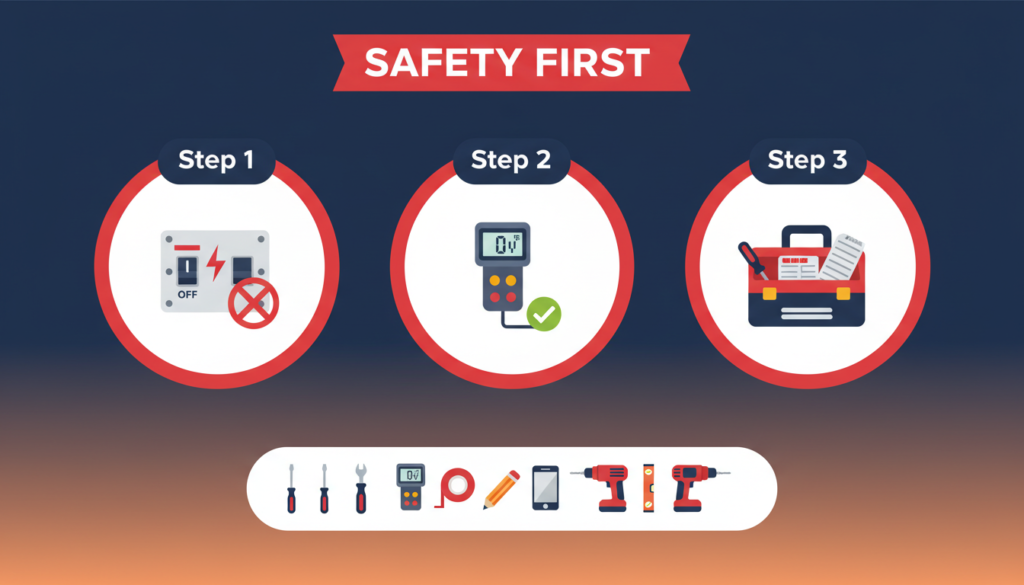
Turn Off the Power
First, you need to turn off the power to your heating and cooling system. Go to your circuit breaker box. This is usually in your basement, garage, or a closet. Find the switch that controls your heating and cooling. Flip it to the OFF position.
If you’re not sure which switch it is, turn off the main power switch. This turns off all the power in your house. You might want to use a flashlight if you do this.
Test to Make Sure Power is Off
After you turn off the power, test your old thermostat. Try to turn on the heat or cooling. If nothing happens, good! The power is off. If something turns on, go back and find the right switch.
You can also use a voltage tester. This is a small tool that beeps or lights up when it touches electricity. You can buy one at any hardware store for a few dollars. Touch it to the wires in your thermostat. If it doesn’t beep or light up, the power is off.
Get Your Tools Ready
- You will need a few simple tools. Most people already have these at home.
- You need a screwdriver. This helps you take off the old thermostat and put on the new one.
- You need labels or tape. You will use these to mark your wires. This is very important!
- A pencil and paper are good to have. You can draw a picture of your wires.
- A phone or camera is helpful. Take a photo of your old thermostat wiring. This helps you remember how it looked.
- You might need a drill if you have to make new holes in the wall. But most times, you can use the same holes.
- A level helps make sure your new thermostat is straight. But this is not required.
Understanding Your Thermostat Wires
Now, let’s learn about thermostat wires. These are the colored wires that connect your thermostat to your heating and cooling system. Most thermostats have 4 to 8 wires. Each wire has a job. They are different colors, so you can tell them apart.
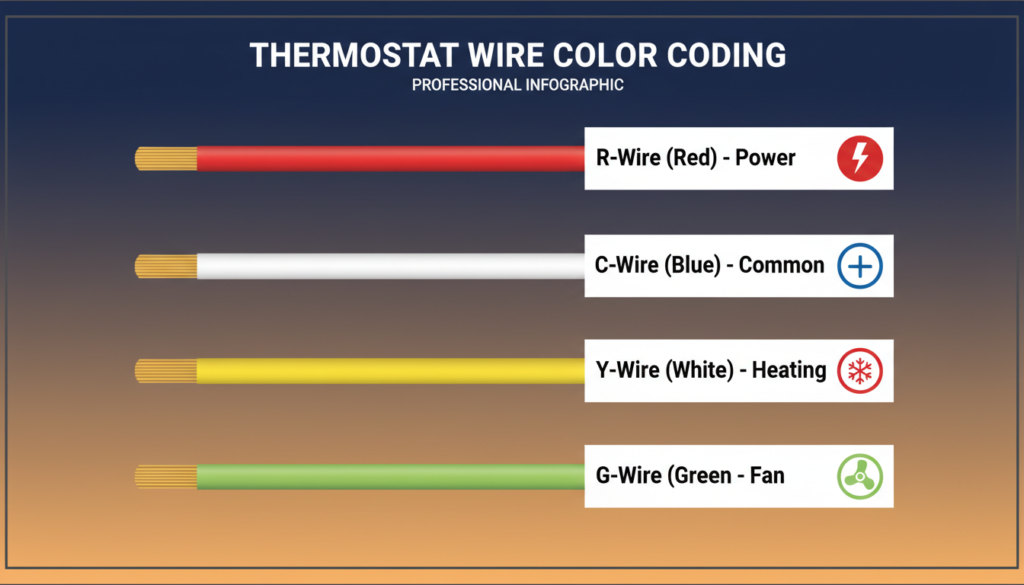
The Red Wire (R Wire)
The red wire is called the R wire. This wire brings power to your thermostat. It’s like the wire that brings electricity to a light bulb. You need this wire for your thermostat to work. Some systems have two red wires. One is called Rc (for cooling), and one is called Rh (for heating). If you have both, that’s okay. Your new thermostat can handle it.
The Blue or Black Wire (C Wire)
The blue or black wire is called the C wire. C stands for “common.” This wire completes the electrical circuit. Think of it like the return path for electricity. Many old thermostats don’t have a C wire. But most new programmable thermostats need one. Don’t worry if you don’t have this wire. We will talk about what to do later.
The White Wire (W Wire)
The white wire is called the W wire. This wire controls your heating system. When your thermostat wants heat, it sends a signal through this wire. Some systems have W1 and W2 wires. These are for systems with two stages of heating. Most homes just have one white wire.
The Yellow Wire (Y Wire)
The yellow wire is called the Y wire. This wire controls your air conditioning. When your thermostat wants cooling, it sends a signal through this wire. Like the white wire, some systems have Y1 and Y2 wires for two-stage cooling.
The Green Wire (G Wire)
The green wire is called the G wire. This wire controls your fan. The fan is what moves air through your house.
Other Wires You Might See
There are a few other wires you might have. The orange wire (O wire) or blue wire (B wire) is used for heat pumps. These are special heating and cooling systems. Don’t worry if you don’t know what all the wires do. Just write down what color goes where. Your new thermostat will have a guide that shows you.
What If You Don’t Have a C Wire?
Many people find out they don’t have a C wire. This is common in older homes. But you have options. Some new thermostats work without a C wire. They use batteries or steal a little power from other wires. Check if your new thermostat can do this. You can add a C wire. If you’re comfortable working with wires, you can run a new wire from your heating system to your thermostat. But this takes more work.
You can use a C wire adapter. This is a small device you install on your heating system. It makes a C wire for you. Many thermostats come with one. If you’re not sure, ask someone who knows about electrical work. It’s better to be safe.
Taking Off Your Old Thermostat
Now it’s time to remove your old thermostat. Remember, the power should be off before you do this.
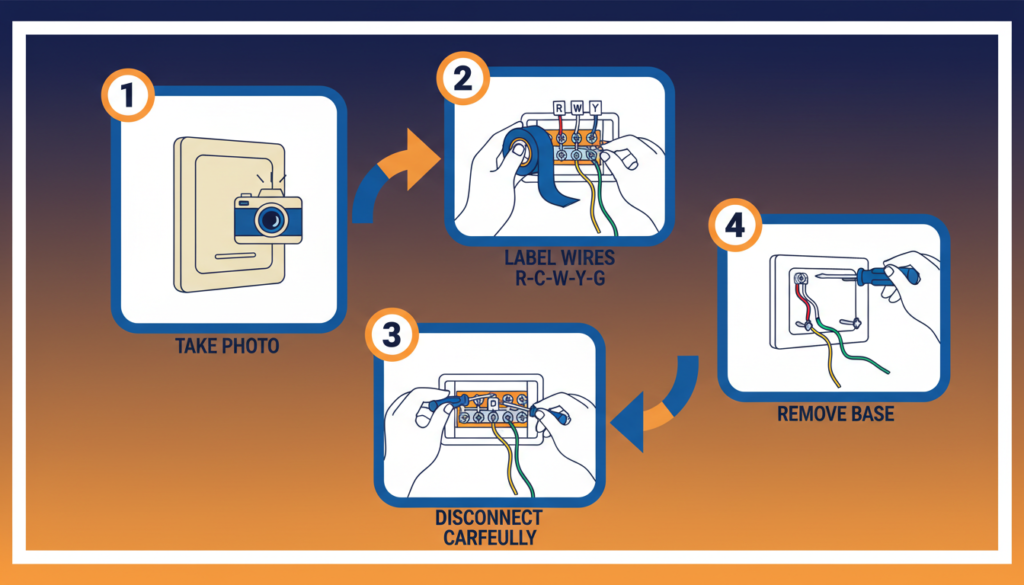
Take a Picture
Before you touch anything, take a picture with your phone. Take a close-up photo of the wires and where they connect. This picture will help you if you forget something.
Label Your Wires
This is the most important step. You must label each wire before you disconnect it. Look at where each wire connects to your old thermostat. You will see letters next to each connection. These letters tell you what the wire does. Put a piece of tape on each wire. Write the letter on the tape. For example, if the red wire connects to “R,” write “R” on the tape on the red wire. If the yellow wire connects to “Y,” write “Y” on the tape on the yellow wire. Do this for every single wire. Some people also write down the wire colors and letters on paper. This gives you a backup if a label falls off.
Disconnect the Wires
After you label all the wires, gently pull them off the old thermostat. Most wires just pull straight out. Some might have a small button you need to push first. Be careful not to let the wires fall back into the wall. If they do, you might need to fish them out. You can put a pencil through the loop of wire to keep it from falling.
Take Off the Old Thermostat Base
Your old thermostat has two parts. The front part (the cover) and the back part (the base plate). The base plate is attached to the wall with screws. Use your screwdriver to take out these screws. Then pull the base plate off the wall. You might see a hole in the wall where the wires come through. Don’t worry about this. Your new thermostat will cover it.
How to Wire Programmable Thermostat-Installing Your New Thermostat Base
Now you’re ready to put up your new thermostat. Let’s start with the base plate.
Thread the Wires Through
Your new thermostat came with a base plate. This is the part that attaches to the wall. Pull your wires through the hole in the base plate. Make sure all the wires come through so you can reach them easily.
Put the Base Plate on the Wall
Hold the base plate against the wall. Try to use the same screw holes as your old thermostat. This way, you don’t need to make new holes. If the old holes don’t line up, you might need to make new ones. Use a pencil to mark where the new holes should go. Then use a drill to make small holes. Put the screws through the base plate and into the wall. Tighten them so the base plate doesn’t move.
Make Sure It’s Level
Use a level to check if your base plate is straight. If it’s not level, loosen the screws a little. Adjust the base plate until it’s straight. Then tighten the screws again. If you don’t have a level, you can use your eyes. Step back and look at it. Does it look straight? If yes, it’s probably good enough.
How to Wire Your Programmable Thermostat
This is the main part. Now you will connect your wires to your new thermostat. Take your time with this step.

Look at Your Thermostat’s Wiring Guide
Your new thermostat came with instructions. Find the wiring diagram. This shows you where each wire should go. Most thermostats have labels next to each connection. These labels match the letters on your wire labels.
Connect Each Wire One at a Time
Start with the R wire. Find the connection labeled “R” or “Rc/Rh” on your new thermostat. Push the red wire into this connection. Most new thermostats have push-in connections. You just push the wire in, and it stays. Some have screws. If yours has screws, loosen the screw, put the wire in, and tighten the screw.
Make sure the wire goes in all the way. Give it a gentle tug. If it doesn’t come out, it’s good. Next, connect the C wire to the “C” connection. This is usually a blue or black wire. Then connect the W wire to the “W” connection. This is your white wire. Connect the Y wire to the “Y” connection. This is your yellow wire. Connect the G wire to the “G” connection. This is your green wire. If you have other wires (like O or B), connect them to the matching connections.
What If You Have Extra Connections?
Some thermostats have more connections than you have wires. That’s okay! You only connect the wires you have. Leave the other connections empty.
What If You Don’t Have Enough Connections?
This usually doesn’t happen. But if it does, check your thermostat’s instructions. You might need a different thermostat model.
Double Check Your Connections
After you connect all the wires, check each one again. Make sure each wire is in the right place. Make sure each wire is pushed in all the way. Compare your connections to the photo you took of your old thermostat. Do they match? If not, fix any mistakes now.
Finishing the Installation
You’re almost done! Just a few more steps.
Attach the Thermostat to the Base
Your thermostat cover snaps onto the base plate. Line up the cover with the base. Then push it on until you hear a click. Some thermostats screw on instead. If yours does, use the small screws that came with it.
Turn the Power Back On
Go back to your circuit breaker. Flip the switch back to ON. This gives power to your heating and cooling system again. If you turned off your main power, turn that back on, too. Your lights and other things will come back on.
Test Your New Thermostat
Now it’s time to see if everything works! First, check if your thermostat screen turns on. If it does, great! If it doesn’t, check your wiring again. Make sure all wires are connected.
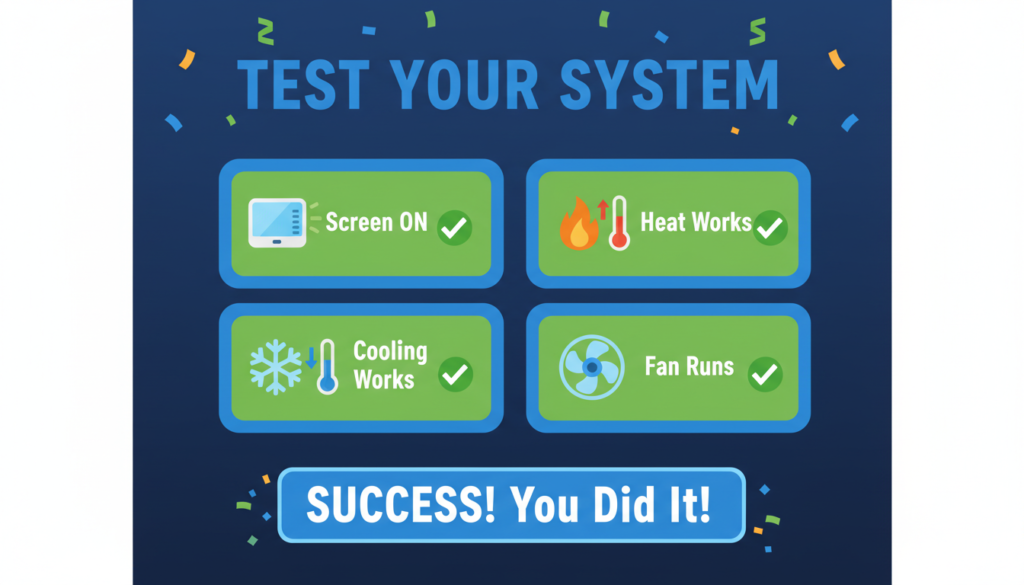
Next, try turning on the heat. Set your thermostat to heat mode. Set the temperature higher than your current room temperature. Wait a few minutes. You should hear your heating system turn on. Feel the air coming out of your vents. Is it warm? If yes, your heating works!
Now test the cooling. Set your thermostat to cool mode. Set the temperature lower than your current room temperature. Wait a few minutes. Your air conditioning should turn on. Feel the air from your vents. Is it cold? If yes, your cooling works!
Also, test the fan. Most thermostats let you turn on just the fan. Try this. You should hear the fan running and feel air moving. If everything works, you did it! You successfully wired your programmable thermostat!
What to Do If Something Doesn’t Work
Sometimes things don’t work the first time. Don’t worry. Here are some common problems and how to fix them.
The Screen Won’t Turn On
If your thermostat screen is blank, check a few things.
- First, make sure the power is on at your circuit breaker.
- Second, check if your thermostat uses batteries. Some thermostats need batteries even if they have a C wire. Put in fresh batteries.
- Third, check your C wire connection. If it’s loose or not connected, your thermostat might not have enough power.
The Heating or Cooling Won’t start.
If your screen works but your heating or cooling doesn’t start, check these things.
- Make sure you set the right mode. If you want heat, it should be in heat mode, not cool mode.
- Make sure you set the temperature right. For heat, set it higher than the current temperature. For cooling, set it lower.
- Wait a few minutes. Many thermostats have a delay. They wait 5 minutes before starting to protect your system.
- Check your wire connections again. Make sure each wire is in the right place and pushed in all the way.
- Check your heating and cooling system itself. Look for an on/off switch. Make sure it’s on.
The Wrong Thing Turns On
If you set it to heat but cooling comes on (or the other way around), you have wires in the wrong place. Turn off the power again. Check your Y wire and W wire. Make sure they’re in the right connections.
When to Call a Professional
Most people can wire a programmable thermostat by themselves. But sometimes you should call a professional.
- Call someone if your wires are damaged or broken. Damaged wires can cause problems.
- Call someone if you have a very old system. Some very old systems work differently.
- Call someone if you’re not comfortable working with electricity. It’s better to be safe.
- Call someone if you tried everything and it still doesn’t work. A professional can find problems you might miss.
Programming Your Thermostat for the Best Results
After you wire your programmable thermostat, you need to program it. This is how you save energy and money.
Set Up Your Schedule
Think about when you’re home and when you’re away. You want different temperatures for different times.
For example, you might want it warm in the morning when you wake up. Then cooler during the day when you’re at work or school. Then warm again in the evening when you’re home. Then cool at night when you sleep.
Most thermostats let you set four time periods each day. Wake time, leave time, return time, and sleep time. Set the temperature for each time period. Remember, you save more energy with bigger temperature differences.
In winter, try 68 degrees when you’re home and awake. Try 62 degrees when you’re asleep or away. In summer, try 78 degrees when you’re home and awake. Try 85 degrees when you’re asleep or away.
Use Different Programs for Different Days
You probably have a different schedule on weekends. Most thermostats let you program weekdays and weekends differently. Set up one program for Monday through Friday. Set up a different program for Saturday and Sunday.
Don’t Make It Too Complicated
Some people try to make very complex programs. But this can waste energy instead of saving it. Keep it simple. Just set it to be comfortable when you’re home. Set it to save energy when you’re away or sleeping.
Tips for Saving the Most Energy
Here are some tips to save even more energy with your new thermostat.
Use the Vacation Mode
If you go away for a few days, use vacation mode. This keeps your house at an energy-saving temperature while you’re gone. It saves a lot of energy.
Change the Temperature Gradually
Don’t make huge temperature jumps. If you usually keep your house at 70 degrees, don’t suddenly program it for 85 degrees in summer. Your system will work too hard- change temperatures by 5 to 10 degrees.
Keep Your Filters Clean
Change your heating and cooling filters every month or two. Dirty filters make your system work harder. This wastes energy even with a programmable thermostat.
Close Vents in Unused Rooms
If you have rooms you don’t use, close the vents in those rooms. This helps your system work less.
Use Fans to Help
Use ceiling fans or other fans to move air around. This makes you feel more comfortable at higher temperatures in summer.
Frequently Asked Questions
Do I Need a C Wire for a Programmable Thermostat?
Many programmable thermostats need a C wire to work. The C wire gives constant power to your thermostat. This powers the screen and the computer inside. If you don’t have a C wire, check if your thermostat can work without one. Some use batteries. Others can steal power from other wires. You can also install a C wire adapter. This is a small box you put near your heating system. It creates a C wire for you.
Can I Install a Programmable Thermostat Myself?
Yes! Most people can install their own programmable thermostat. You don’t need special skills. You just need to follow the steps carefully. Make sure you turn off the power. Make sure you label your wires. If you do these two things, you’ll be fine. The whole job takes 30 to 45 minutes for most people.
What Tools Do I Need to Wire a Thermostat?
You need just a few simple tools. A screwdriver is the most important tool. You need this to take off the old thermostat and install the new one. You also need something to label your wires. Tape and a pen work great. A phone or camera helps you take pictures. A voltage tester is good for safety. That’s all you really need!
How Do I Know Which Wire Goes Where?
This is easy if you label your wires first. Each wire on your old thermostat connects to a letter. The same wire connects to the same letter on your new thermostat. For example, if the red wire connected to “R” on your old thermostat, it connects to “R” on your new thermostat. Just match the letters. Don’t worry about the colors.
What If My New Thermostat Has Different Wires Than My Old One?
Sometimes your new thermostat has more connections than your old one. That’s okay! Just connect the wires you have. Leave the extra connections empty. Sometimes it’s the other way around. You have more wires than connections. This is less common. Check your new thermostat’s instructions. There might be special instructions for this.
Is It Safe to Wire My Own Thermostat?
Yes, it’s safe if you turn off the power first. Thermostat wires carry low voltage. This is much safer than regular house wiring. But you still need to turn off the power at the circuit breaker. This is very important. If you’re not comfortable working with any kind of electricity, call a professional. It’s better to be safe.
How Much Money Will I Save?
Most people save 10 to 30 percent on their heating and cooling bills. The exact amount depends on how you program your thermostat. If you currently keep your heat or air conditioning on all day, you’ll save more. If you already turn it off when you leave, you’ll save less. A programmable thermostat usually pays for itself in less than a year.
Can I Use My Old Thermostat’s Wires?
Yes! You can use your old wires. That’s why you label them before you take off the old thermostat. The wires don’t go bad unless they’re damaged. If your old thermostat worked, your wires are probably fine.
What If My Wires Are Different Colors?
Sometimes wires are different colors from what we talked about. That’s okay! What matters is not the color. What matters is where the wire was connected on your old thermostat. That’s why you label each wire with the letter from your old thermostat. Just match the letters, not the colors.
How Often Should I Change the Batteries?
If your thermostat uses batteries, change them once a year. Many people change them when they change their smoke detector batteries. Some thermostats beep when the batteries are low. Change them right away when you hear the beep.
Can I Move My Thermostat to a Different Wall?
Yes, but it’s more work. You need to run new wires from your heating system to the new location. This is harder than just replacing a thermostat in the same spot. You might want to hire someone for this.
Final Tips for Success
Here are some final tips to help you succeed with wiring your programmable thermostat.
Read the Instructions- Every thermostat is a little different. Read your thermostat’s instructions before you start. They have important information for your specific model.
Take Your Time– Don’t rush. This job is not hard, but you need to be careful. Take your time to label wires correctly and connect them correctly. If you rush, you might make mistakes. Then you have to do it again.
Ask for Help If You Need It– If something doesn’t make sense, ask for help. You can call the thermostat company’s customer service. Most have free phone support. You can also ask a friend who knows about these things. Or look for videos online that show your specific thermostat model.
Keep Your Old Thermostat– Don’t throw away your old thermostat right away. Keep it for a few weeks. If you have problems with the new one, you can put the old one back on. After a few weeks, when you know everything works, then you can throw it away or recycle it.
Write Down Your Settings– After you program your thermostat, write down your settings. Put the paper somewhere safe. If you ever need to reset your thermostat, you’ll have your settings written down. You won’t have to program it all over again from memory.
Conclusion
Now you know how to wire a programmable thermostat! It’s not as hard as it looks. You just need to be careful and follow the steps.
Remember the main points. Turn off the power first. Label every wire before you disconnect it. Connect each wire to the matching connection on your new thermostat. Turn the power back on and test everything. A programmable thermostat will save you money every month. It will make your home more comfortable. And you did it yourself!
If you follow this guide, you can wire your programmable thermostat in less than an hour. You’ll feel good about doing it yourself. And you’ll love the money you save. So get your tools ready. Get your new thermostat. And follow these steps. You can do it!